Is Google Analytics Working on my Blogger Blog?

So you’ve already viewed my tutorial on how to create a Google Analytics account and link it to your Blogger blog and you THINK that you have everything all set up.  But is it?  How can you be sure?

Here are a couple of things you can check to make sure that Google Analytics is correctly tracking your blog traffic:


1. Double Check that Blogger knows your Google Analytics Tracking ID
Log in to Blogger and go to Settings/Other and scroll all the way down.  Blogger should have your Tracking ID listed like this:

If it’s not there – you need to go find it, paste it in, and click “Save Settings”.  You can find it by logging into Google Analytics and looking under Admin/Property Settings.


2. View the Source
Load your blog’s home page in a web browser.  Then view the source code of that page using the “view source” command.  When the source code loads in a new window, do a FIND and search for your Tracking ID to see if it appears in your source code anywhere.  


If it is correctly installed, you should find a snippet of code that looks something like this:

If you don’t know how to view the source code of a webpage, Google “How do I view source in Google Chrome”, being sure to replace “Google Chrome” with whatever browser you happen to be using.  

If you don’t know how to search the contents of the source code, Google “How do I use the find command in Google Chrome?”, again, replacing “Google Chrome” with your browser (Or just start using Google Chrome from now on – You will be a happier person).

If you can’t find a snippet of code with your Tracking ID in it, something is not right – go back to step one.


3. Check Google Analytics Real-Time
This is a fun one – kind of the equivalent of looking in the mirror to see if you’re really there.  Log in to Google Analytics.  Click on the name of your blog to view the “Reporting” overview.  Then select the “Real Time” link on the left hand menu.

Click on the Real-Time “Overview.  Now open a new window (or tab, since you’re using Google Chrome now you might as well get used to tabbed browsing).  Go to your blog url (the one you are trying to track).  Once your blog’s home page loads up, go back to Google Analytics window.  You should see this:

Nice work.  You’re watching yourself read your own blog.  This proves that it works and that everything is set up correctly.  You’re done – go do something fun, like find animated GIFs of people clapping!

If you see 0 active users – something is not right.  Go back to step one.


Once you are successful installing Google Analytics – I recommend that you start checking it once a week to monitor your blog traffic.  If you need help – here is a link to the Google Analytics Help Center.


Adding Open Graph Protocol (OGP) tags to your Blogger Blog

The Open Graph Protocol is a relatively new way to turn any web page into a sharable social object by adding tags to identify key attributes for that page when shared on a social network like Facebook.  Before we look at these OGP tags and how to integrate them into your Blogger blog, let’s take a look at how website links are shared on social networks.

Sharing Links on Facebook
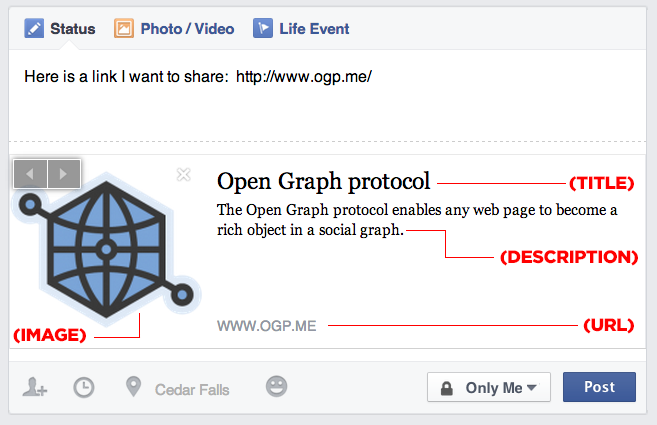
When you share a URL while creating a Facebook status update, Facebook scans that webpage and automatically generates a preview of that content which includes some useful information in addition to the URL you typed:

  • A TITLE for the web page you are sharing
  • A brief DESCRIPTION of the content on that page
  • An IMAGE from the page

Once you publish your status, these extra bits of information become very important, as they will likely influence whether one of your friends will click on the link.  If the image looks intriguing, or if the copy seems interesting, your shared URL will likely be clicked on.

However, sometimes when you share a link, Facebook’s automatically generated image, title, and description are either missing entirely or not very compelling. In the post below, notice that there is no associated image or description – just a title and url.

As digital content publishers who want to make our content as sharable and clickable as possible, this can be a real issue.  Fortunately, Facebook provides a number of sharing best practices that can help.

First Step: Learn about the Open Graph Protocol
Facebook describes several open graph tags that it recommends integrating into your site to help Facebook generate previews.  The main tags which Facebook uses when generating previews are:

  • og:title – the title of the page you are sharing
  • og:description – a detailed description of the content on the page
  • og:url – the URL of the web page
  • og:image – the URL of the image you want shown
  • og:site_name – the name of the website you are sharing
  • og:type – the type of content you are sharing (blog, website, article, etc)

The syntax for an open graph tag is similar to other meta tags used in HTML.  For example, the og:title tag can be written as:

<meta property=”og:title” content=”Title of your Page”>

Open graph tags are placed in the <head> section of your HTML file. For a complete description of each tag, visit the Open Graph Protocol website.

How Facebook “Sees” your Page
To understand how Facebook ingests a webpage to generate a preview, use Facebook’s Open Graph Debugger.  This helpful tool will allow you to enter any URL and get a “scrape” of what Facebook finds when it scans the page.  It will alert you when there are issues that need to be addressed. 


 It will also generate a preview to show you how your page will appear if a Facebook user shares it on their timeline.

Time to Fix your Blogger Blog, OG style
In a previous post, I discussed the use of Title and Meta Description tags, which are very important for your blog’s SEO.  I also described a method of optimizing how Blogger generates title tags to improve your blog’s SEO.  Read these posts before you go any further!

Because Blogger dynamically generates the pages in our blog based on templates, we thankfully do not need to manually add OG tags to every blog page/post.  That would be a major headache!  Fortunately for us, we can update a few lines of HTML code in our blog’s template that will automatically update all our pages and posts – including any new pages and posts we create in the future.

What we’ll be doing is telling Blogger exactly how to handle the TITLE, META DESCRIPTION, and OG tags on 1. your blog’s home page and 2. your blog’s various posts and pages.  We will do this by using IF statements. 

Here is the code you will insert into the <HEAD> section of your Blogger template:

<!–START CUSTOM CODE–>

<meta property=’og:url‘ expr:content=’data:blog.canonicalUrl’/>
<meta property=’og:title‘ expr:content=’data:blog.pageTitle’/>
<meta property=’og:site_name‘ expr:content=’data:blog.title’/>

<b:if cond=’data:blog.pageType == &quot;item&quot;’>
<title><data:blog.pageName/> | <data:blog.title/></title>
<meta property=’og:image‘ expr:content=’data:blog.postImageUrl’/>
<meta property=’og:type‘ content=’article’/>

<b:else/>
<title><data:blog.pageTitle/> – PUT ANY ADDITIONAL TITLE COPY HERE</title>
<meta property=’og:image‘ content=’PUT YOUR IMAGE URL HERE‘/>
<meta property=’og:type‘ content=’blog’/>
</b:if>

<b:if cond=’data:blog.metaDescription’>
<meta property=’og:description‘ expr:content=’data:blog.metaDescription’/>
</b:if>


<!–END CUSTOM CODE–>

Select this code and COPY it.  Then read on.

Important note: before you start editing your blog’s HTML code, you’ll want to make sure that you are happy with the template you are using.  Because we’re going to customize the code associated with a specific instance of a template, it is important to realize that if you ever change your template for any reason, you will lose the work you’re about to do!

Time to Get Geeky: Come Edit Your Template’s HTML with Me
Ready? Let’s do this. Go to Blogger and click on your blog.  Click on the “Template” button on the left hand menu. 

Click on the “Edit HTML” button and be prepared to feel a surge of geeky neuronic energy course throughout the synapses of your brain.


Take a deep breath.  Repeat to yourself: “It’s just a text file.  It’s just a text file.  I can handle this!”

Now very carefully find the <title> tag that exists in the code.  Select the title tag code and everything inside it.


Delete it.  Then replace it with the code I gave you earlier in this post.  


Be sure to carefully EDIT the parts of the code marked “PUT ANY ADDITIONAL TITLE COPY HERE” and “PUT YOUR IMAGE URL HERE”.

This code creates og:url, og:title, and og:site_name tags that are dynamically generated from Blogger’s page url, Blogger’s page title, and your blog’s title. It then creates og:image and og:type tags (IF the page is a normal post or page).  Otherwise, it creates og:image and og:type tags for your home page which are different.  Finally, it creates an og:description tag that is populated from the meta descriptions that you create for your pages.

Once you are done, click “Preview template”.  If you have made any errors or broken any of the code – it should give you an error message and tell you what the issue is.  If your preview looks good, then click “Save Template”.

You’re Not Done Until You Test Your Pages!
To test your pages, go back to Facebook’s Open Graph Debugger and try your pages out. It will give you a preview of how each page will look when shared.

Yeah! That’s what I’m talkin’ about!

Acknowledgements
I’d like to acknowledge the help of the following two blog posts which helped me greatly in patching together the above code that both improves SEO and adds OG tags to Blogger posts and pages:

Adjust Blogger Title Tags to Improve SEO by Muhammad Faisal
and
How to Add Open Graph Protocol in Blogger Blogs by Muntasir Minhaz

Thanks guys!


Are Blog Posts Read via RSS Feed Readers Tracked by Google Analytics?

A great question came up in class today: If someone reads your blog post through an RSS reader, will their activity be tracked by Google Analytics?

Photo by Robert Scoble

First of all, let’s be sure you understand what an RSS feed is and how it is “read” by RSS readers.

This is the icon for an RSS Feed
(design by Stephen Horlander)
.

An RSS feed is an XML document that contains the raw data contained in your blog posts in a structured format that can be easily read and displayed in other applications.  The default setting on Blogger blog is to allow RSS feeds, so there is nothing special you need to set up.  

You can view the RSS file for the class blog at: https://digital.uni.edu/feeds/posts/default?alt=rss

Note that this text file contains tags to describe the blog:

<title> The title of the blog
<description> The blog description
<link> The blog URL
<managingEditor> The editor of the blog’s content

It also includes each blog post that has been published on your blog enclosed in <item> tags. 

<title> The title of your post
<description> The body text of your post (including HTML tags and links)
<link> The URL of your blog post
<author> The author of the blog’s content 

This allows other applications (like Feedly) to download the RSS file and “re-publish” the posts.  But does Google Analytics track the user activity of viewers who are viewing the site via a Feed Reader?  The answer, according to Google, is unfortunately no.

Google’s Analytics support page states:

Tracking visits from RSS feeds
In order for Google Analytics to track data, it is necessary that the Google Analytics tracking code gets executed. Since most RSS/atom readers cannot execute JavaScript, Analytics will not count pageviews that are loaded through an RSS reader. Analytics requires that the visitor execute a JavaScript file on Google’s servers in order to track that pageview.

Since an RSS feed reader only downloads and displays the contents of the RSS file, and not the actual HTML and JavaScript code of the blog itself, Google Analytics cannot track pageviews of blog posts read in RSS feed readers.

Photoshop (PSD) Templates for iPhone and Android Mobile App Previsualization

Before you start working in Photoshop, save yourself time and effort by finalizing your wireframes.  It’s a lot easier to quickly change your hand-drawn wireframe sketches than modify a Photoshop file!

Once you have your wireframes where you want them, here are links to some design templates for Adobe Photoshop to help you create the pre-visualizations:

Teehan + Lax iPhone 6 Template
Updated Photoshop template for iOS 8 and iPhone 6 from Digital Experience agency Teehan + Lax.

Teehan + Lax Android Template
Photoshop template for Android devices (also from Teehan + Lax).  This one is a little outdated, but still useful.


If you like these templates, give a shout out to @teehanlax on Twitter.  They’ll appreciate it.

– – –

If these templates don’t work for you (or if you are averse to sweater vests), here are a few other sources to try:

9 Highly Recommended Free Android UI Kit PSDs
Choose one that works for you.  From TwelveSkip, the blog of Web designer Pauline Cabrera.

Smashing Magazine iPhone PSD Vector Kit
Photoshop template with many of the iPhone 4 UI graphics. This is a little out of date.  From the awesome web publication Smashing Magazine.

If none of these work for you, try searching Google for “iPhone PSD template” or “Android PSD template”.

– – –

Cool Mobile Marketing Campaigns

Mini Getaway Stockholm – Mini Cooper

A promotion for the launch of the Mini Countryman in Stockholm, Sweden in 2010.  Over 11,000 Swedes downloaded the app and participated in a massive multiplayer augmented reality game that involved “catching” a virtual Mini only visible through the app.  Created by creative agency Jung von Matt in Sweden.

Chok! Chok! Chok! – Coca Cola

A fantastic campaign developed by McCann Hong Kong for Coca-Cola.

 Mobile Medic App – Australian Defense Force

A recruitment campaign for the Australian Defense Force involving an augmented reality-driven medical diagnosis app.  Prospective recruits use the app to try and “diagnose” a patient’s billboard.  The ad functions as a kind of entrance exam.  This campaign won several Cannes Lion awards in 2012 for GPY&R and VML.

Heineken Star Player

An engaging iPhone app for interacting and competing with UEFA Champion League football fans during games.  More info on game and results here.  Created by AKQA.

Band Aid Magic Vision

Award-winning augmented reality application produced by LA digital agency 9K9 and global agency JWT.


Diesel Jeans
QR Codes combined with Facebook integration make it easy for shoppers to “like” Diesel Jeans.

Wireframing Your Mobile App

Once you have an idea of what type of mobile app your group will be designing and what some of the features will be, the next step will be to start sketching out exactly how this app will work. This is done with a technique called wireframing – a rough approximation of what will appear on each screen of your app and how users will interact with it.

Photo by Flickr user Baldiri

Wireframes can be done in many different ways using many different tools – from simple hand drawn sketches to detailed annotated illustrations using robust software tools. For this project you will not need anything more complex than some simple hand-drawn sketches.

Photo by Flickr user Fernando Guillen


The goal of a wireframe is to quickly communicate how the app will look and how it will function for a user.  Wireframing involves multiple screens/pages that connect to one another through buttons or other interface elements.

Here is one helpful tool that you can print out multiple copies of for quick sketching that still has a “clean” look: a set of printable iPhone 4 wireframe templates:

UPDATE: Here is a set of printable iPhone 6 wireframe templates.


If you do a little Googling, there are tons of wireframing tools, templates, and toolkits available out there (including this gorgeous toolkit for Adobe Illustrator).  Most are overkill for this project.  My advice is to stick with sketches and stay focused on the concise communication of your app’s layout and functionality.

A Cavalcade of Tweets

Some great action on the #unidigadv hashtag this week! My students have been working really hard to complete an epic three month long project using social media to build a personal brand. Their final deliverable was a 20-30 slide presentation documenting their project, the quantitative metrics they collected along the way, and their assessment of their success. Many students started panicking on Wednesday as they realized how much work their final presentation would entail.

#unidigadv getting close to project time, anyone else questioning why you waited so long to post?

— Marie Pistek (@RealEtechs) November 13, 2013

Social media project due in T-minus 54 hours. Having a minor panic attack #unidigadv

— Lindsay Hotze (@lindsayhotze) November 13, 2013

After seeing past presentations of #unidigadv Social Media Projects…I've made the executive decision to go hide until Christmas. Bye.

— Kayla Wolthoff (@kwolthoff) November 13, 2013

Is it just me, or is everyone freaking out about this presentation due in two days? #unidigadv

— Janey Meyer (@UNIquefashion23) November 13, 2013

So who's completely overwhelmed with this presentation?! #unidigadv

— Kaylin Westhoff (@TuneInCountry) November 14, 2013

It's sickening/incredible how fast time flies when working on my Social Media Project #unidigadv #almostdone

— Dynamite Ads (@DynamiteAds) November 15, 2013

Doug Drees and Therese Kuster from Targetclick were listening in and gave my students an open invitation to contact Targetclick for internships. Nice to see some local industry professionals who know where to look for talent!

@cecilkleakins Have any rockstar #unidigadv students looking for an internship next semester? Have them reach out to @TargetClickMktg

— Doug Drees (@DougDrees) November 13, 2013

@DougDrees @cecilkleakins @TargetClickMktg We'd love to hear from them! Lots of great opportunities with our team.

— Therese Kuster (@tckuster) November 13, 2013

As the project deadline loomed, students began to see the light at the end of the tunnel as they wrapped up their projects. There was a mixture of exhilaration, sadness, and accomplishment.

Finishing up my #socialmedia project for #unidigadv. Learned so much! #bittersweet

— Melissa Fager (@MidwestTourism) November 15, 2013

27 slides and 12 hours later…I'm done with my presentation!! #unidigadv

— Connie Chuong (@chuongconnie) November 15, 2013

3 months ago I started a blog. Now I'm summing it all up in one epic masterpiece #unidigadv

— Clay Swanson (@clayswansun) November 15, 2013

1 hour and 5 minutes until our #unidigadv project is due. Time for the final adjustments.

— Cody (@CodyRohlf) November 15, 2013

Getting closer to finishing #unidigadv #BrandingProject2013

— Marie Pistek (@RealEtechs) November 15, 2013

Wishing I wasn't such a perfectionist when it came to creative projects..6 on a Fri night and I'm still working away #homestretch #unidigadv

— Courtney Nagle (@CourtNagle) November 16, 2013

ABOUT TO SUBMIT MY #unidigadv PROJECT. Can I get a round of applause? WHOO HOO

— Bailey Anderson (@travel_merIT) November 15, 2013

Yes – you can get a round of applause – you ALL can.

Nice work. Have a great weekend.

When you think of a blog, what do you think of?

A lot of students new to blogging have a hard time with how blogging is useful in marketing.  I have found that this is mainly because when students think of what a blog is, they think of personal blogs filled with diary-style musings about their personal life or a Tumblr-esque cascade of animated GIFs.


I’d like to make sure you have some good examples of professionals who use blogs to promote their personal brand by creating interesting original content.  


Here are a few blogs about marketing that you should take a look at and learn from.

Logic + Emotion
David Armano, VP at Edelman in NYC, is always posting insightful ideas 

Erika Napoletano
Erika is a copywriter who irreverently writes about marketing, advertising, branding, and business from a unique perspective.

Chris Brogan
Chris is a publisher and business consultant. He helps business owners and marketers get up to speed on what he calls the “personal business revolution”.

I’d encourage you to use tools like Google Blog Search to find influential blogs in the topic area(s) surrounding your personal brand.  Set up a blog reading tool like Feedly to check in on them as you would check on news, sports, or Facebook happenings.

Welcome to my new Digital Advertising students!

Welcome to the class blog.  This site serves as a digital repository of resources and content we will be talking about and using in class.  It’s also a great way for me to showcase some of the things that you’ll be doing with your blog during the course of this semester.


Once you all create your own blogs, they will be listed on the right nav bar under the “Class Blogs” link. 


Feel free to read ahead and explore – see you in class.

Add a Spotify Playlist to your Blog

I’ve noticed a lot of students are writing about music this semester. One of the challenges with music writing in the past has been trying to give the reader an idea of what the music sounds like without actually playing the music.

Today, however, you have other options – some of you have been embedding YouTube videos in your blog posts. That works – but can also be distracting.

Here is one way to just share songs and playlists with your blog readers using Spotify.

You can share songs on Spotify (like this awesome Thelonius Monk tune):

Or you can share entire Spotify playlists (Like this playlist of highly recommended jazz tunage):

How do you do it? Follow these steps:

  1. Download and Install Spotify. Create an account (the basic account is free – supported by ads which may interrupt your music listening).
  2. Search for music that you like and create a playlist that you want to share.
  3. Right click [PC] or control click [Mac] on the name of your playlist and select “Make Public” if it is not already checked.
  4. Right click [PC] or control click [Mac] on the name of your playlist and select “Copy Playlist Link”.
  5. If you only want to embed a single song, Right click [PC] or control click [Mac] on the name of the song and select “Copy Song Link”.
  6. Go to WordPress and create a new post. Create a “Spotify” block and paste the embed link into the block.
  7. Preview your blog post. Look OK? Great – Click “Publish”!

CAVEAT: Your reader must have Spotify installed to listen to your playlist.  

Easy, huh? So what are you waiting for? Go try it on your own blog! And for those about to rock, I salute you!